


Photograph Analysis
Studying photographs can be like studying a short story. You see the main, dramatic events, but if you really study a photograph you will uncover even more to the story than you realized. Historians learn to study photographs in order to gain as much information as possible. This information helps them piece a story together and form the best possible explanation, (who, what, where, when and why) of the photograph. Look at the photographs in the folder. Choose one photo you would like to study. Follow the steps below to learn as much as you can about your photograph.
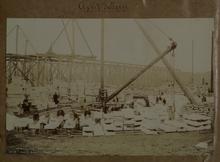
In addition to exploring the photogrpahs through the questions below, students can also learn about the construction site hazards Capitol workers faced and how workplaces have been made safer through the “Dangerous Work Conditions” activity sheet attached below. Students write the dangerous conditions they see in the photographs and write suggestions for how to make the working situations safer.
Student materials
| Attachment | Size |
|---|---|
| 50.83 KB | |
| 166.77 KB |
Objectives
Observe
Take a few minutes to look at your photograph. Notice as much as you can about the main events and obvious information the photo gives. This initial impression will be the big picture you will come back to after studying the photograph in depth later.
Who
Now it is time to start recording what you see. Study the people in your photo. Can you tell if they are male or female? Do you have any idea what their job may be? Are there other people in the photo as well? Do they seem to be working together, or are they working independently?
What?
Can you tell what’s going on in the photograph? Is there a main event that is taking place, or any action that is central to the photograph? Can you infer (understand) what just happened or what might be about to happen? Are there any safety issues you see?
Where?
Describe where the photograph was taken. Was it taken outside or
inside? What parts of the Capitol building are visible? What kinds of natural
environment are shown? Do you see any other buildings in the background?When?
Study the photograph for clues about when the photograph was taken. Can you
tell what time of day it is? Does the photography help you determine what
season of the year it was taken? Does the photograph appear to be taken before
construction of the Capitol began, during the intermediate stages of construction,
or near the end of the construction project?Why?
This step can sometimes be hard to figure out. One way to help you determine
why the photograph was taken is to focus on the main event of the photo. What
do you think the photographer was focusing on? Do you think it was the
people? Do you think the event or the items in the photograph seem to be more
important than the people? Does it look like the photographer was taking candid
shots, or do the people in the photograph seem to be posing?Conclusion
It’s now time to draw some conclusions explaining your photograph. You have
studied your photograph in great detail, and have gained as much information as
you could regarding who, what, where, when and why of the photo. Using the
information gathered above, write a paragraph explaining your thoughts about
the story behind your photograph. Use your notes from above to assist
you. Include as much detail as you can to support your findings.


 supervising setting one of Six Virtues statues")


